credentials::ssh_setup_github()Lab 0
Mise en place
Lab
Due: End of lab on Mon, Aug 25
Mise en place (French pronunciation: [mi zɑ̃ ˈplas]) is a French culinary phrase which means “putting in place” or “gather”. It refers to the setup required before cooking, and is often used in professional kitchens to refer to organizing and arranging the ingredients (e.g., cuts of meat, relishes, sauces, par-cooked items, spices, freshly chopped vegetables, and other components) that a cook will require for the menu items that are expected to be prepared during a shift.1

This lab is all about setting up your computing environment for the course and putting in place all the bits and bobbles you’ll need for the rest of the semester and it’s about getting to know each other and the teaching team.
And just like the mise an place phase for cooking something that is new to you, it might not be entirely clear how everything will come together at the end. Hang in there, and it’ll all start to make sense by the end of the week. And you’ll be a pro at it all just in time for the first assignment!
Hello, World!
Computational toolkit
You may have heard/seen this phrase, Hello, World!, elsewhere before. It’s usually the first thing you learn in programming – to learn to write a computer program to print this sentence to screen. Things will be different in this course, as it’s not a programming, but a data science course. So, starting tomorrow in class, you’ll learn to use a computing language (called R) to work with data.
But today, we need to set you up for success! Let’s first briefly review the components of the computational toolkit for the course:
R: The programming language you’ll learn in this course.
-
RStudio: The piece of software (a.k.a. the integrated development environment, IDE) you’ll use to write R code in.
NoteR is the name of the programming language itself and RStudio is a convenient interface.
-
Quarto: The tool you’ll use to create reproducible computational documents that contain both your narrative (i.e., words in English) and your code (i.e., code in R). Every piece of assignment you hand in will be a Quarto document.
NoteYou might be familiar with word processors like MS Word or Google Docs. We will not be using these in this class. Instead, the words you would write in such a document as well as the code will go into a Quarto document, and when you render the document (more on what this means later) you will get a document out that has your words, your code, and the output of that code. Everything in one place, beautifully formatted!
Git: Version control system.
-
GitHub: A web hosting service for the Git version control system that also allows for transparent collaboration between team members.
NoteGit is a version control system (like “Track Changes” features from Microsoft Word but more powerful) and GitHub is the home for your Git-based projects on the internet (like DropBox but much better).
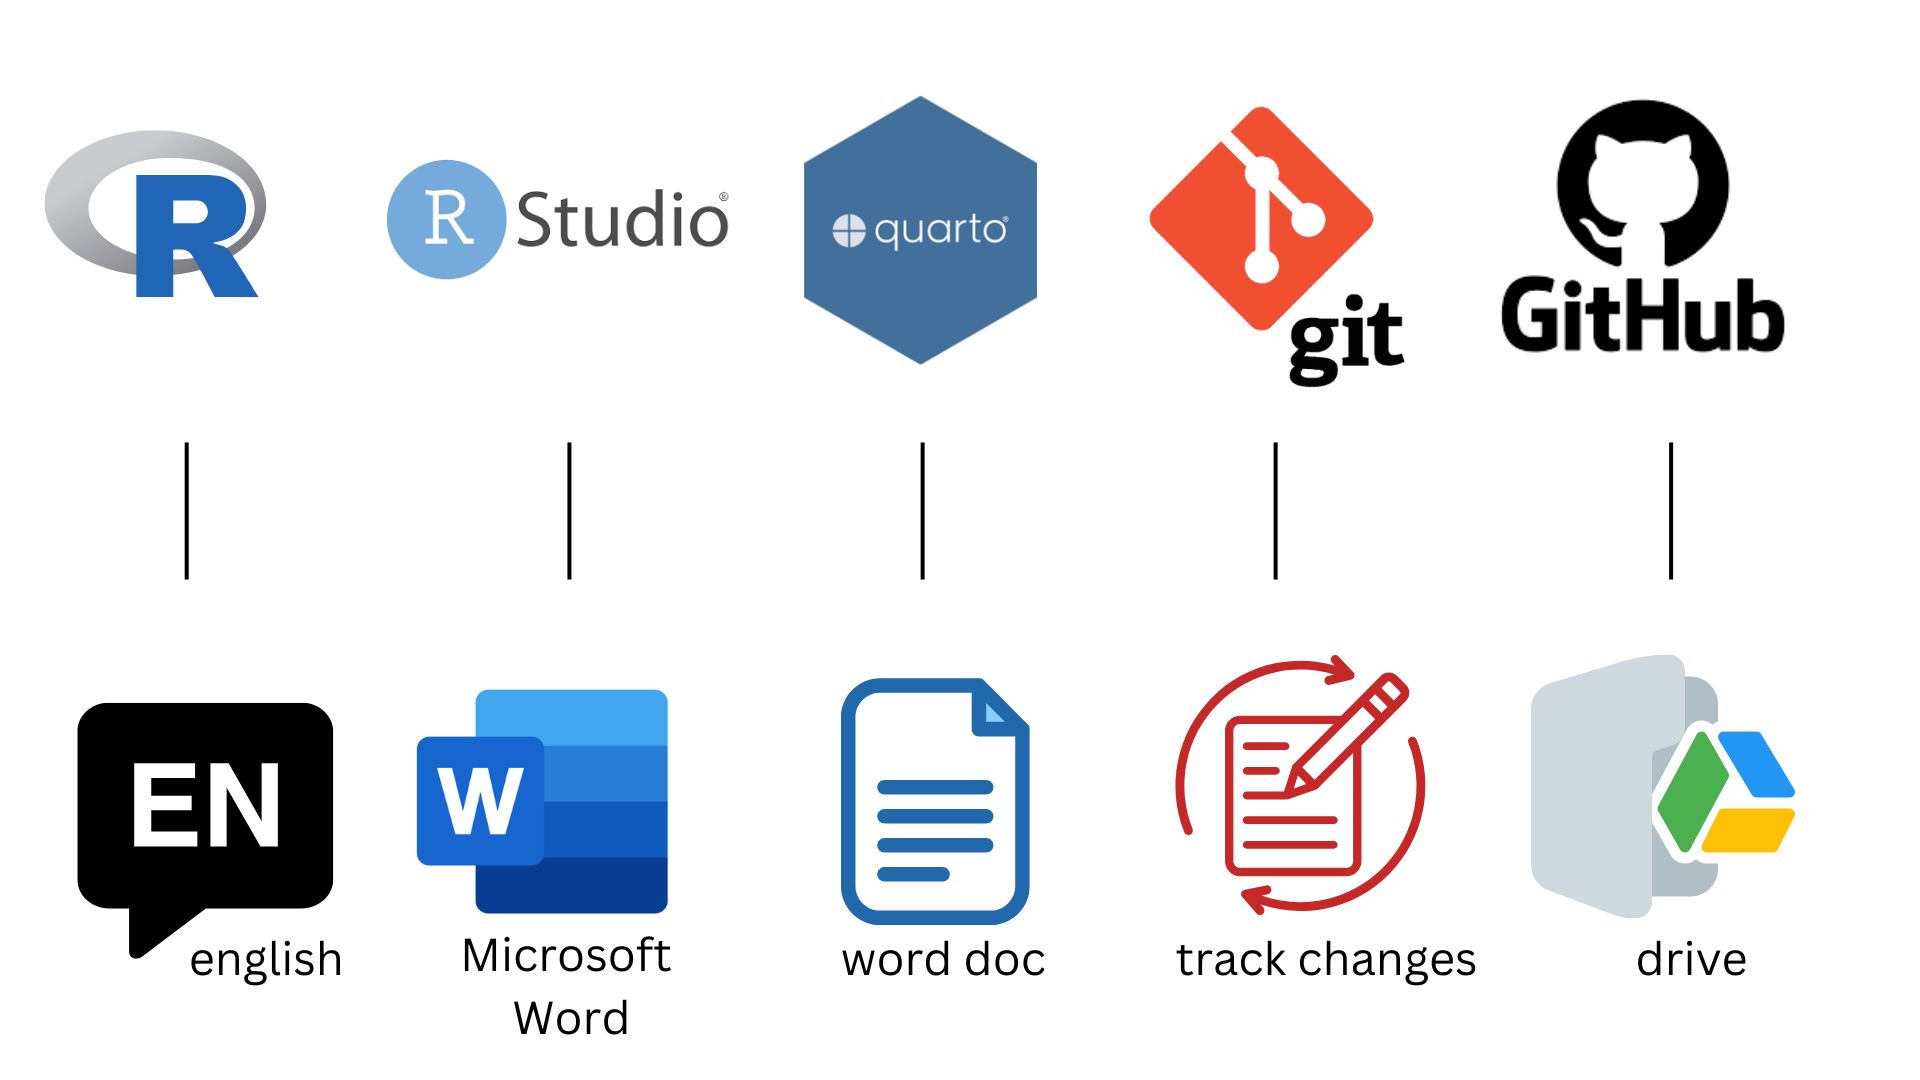
An analogy to English
While most of the above tools might be new to you, they have many similarities with tools you have probably seen before.
Suppose you wanted to write an essay for a literature class. You would need to pick a language (e.g. English) and choose an interface to write your document with (such as Microsoft word with a .docx word doc). You also might want to use track changes to see edits you make and use a platform such as Google Drive to collaborate.
While the computational toolkit is different than the one for a literature class, we can find many similarities between the tools, as is shown in the figure below.
Access R and RStudio
- Go to https://cmgr.oit.duke.edu/containers and login with your Duke NetID and Password.
- Click
STA199to log into the Docker container. You should now see the RStudio environment.
Go to https://cmgr.oit.duke.edu/containers and under Reservations available click on reserve STA199 to reserve a container for yourself.
Note
A container is a self-contained instance of RStudio for you, and you alone. You will do all of your computing in your container.
Once you’ve reserved the container you’ll see that it will show up under My reservations.
To launch your container click on it under My reservations, then click Login, and then Start.2
Create a GitHub account
Go to https://github.com/ and walk through the steps for creating an account. You do not have to use your Duke email address, but I recommend doing so.3
Note
You’ll need to choose a user name. I recommend reviewing the user name advice at https://happygitwithr.com/github-acct#username-advice before choosing a username.
What if I already have a GitHub account?
If you already have a GitHub account, you do not need to create a new one for this course. Just log in to that account to make sure you still remember your username and password.
Update your GitHub profile
Once you have created your GitHub account, you should update your profile.
To do so, click on your profile icon in the upper right corner of the GitHub page and select Settings. Then, on the left side of the page, click on Public profile and fill out your profile information.
Once done, click Update profile mid-way through the page.
Add a profile picture
This is not required, but highly recommended. It will help us get to know you (and recognize you in class) and will also help you get to know your classmates.
Set up your SSH key
You will authenticate GitHub using SSH (Secure Shell Protocol – it doesn’t really matter what this means for the purpose of this course). Below is an outline of the authentication steps; you are encouraged to follow along as your TA demonstrates the steps.
Note
You only need to do this authentication process one time on a single system.
- Go back to your RStudio container and copy-and-paste or type the following in the Console.
- This will print a message in the Console. Read it. It should say: “No SSH key found. Generate one now?” You should click 1 for yes.
- This will generate a key (basically a really long alpha-numeric password). R will then ask “Would you like to open a browser now?” You should click 1 for yes again.
- You may be asked to provide your GitHub username and password to log into GitHub. After entering this information, you should paste the key in and give it a name. You might name it in a way that indicates where the key will be used, e.g.,
sta199).
You can find more detailed instructions here if you’re interested.
Configure Git to introduce yourself
There is one more thing we need to do before getting started on the assignment. Specifically, we need to configure your git so that RStudio can communicate with GitHub. This requires two pieces of information: your name and email address.
To do so, you will use the use_git_config() function from the usethis package.
Note
You’ll hear about 📦 packages a lot in the context of R – basically they’re how developers write functions and bundle them to distribute to the community (and more on this later too!).
Type the following lines of code in the console in RStudio filling in your name and the address associated with your GitHub account.
usethis::use_git_config(
  user.name = "Your name",
  user.email = "Email associated with your GitHub account"
)
For example, mine would be
usethis::use_git_config(
  user.name = "Mine Çetinkaya-Rundel",
  user.email = "cetinkaya.mine@gmail.com"
)
Note
I used my gmail because that is the one I used to create my GitHub account. You should also be using the email address you used to create your GitHub account, it’s ok if it isn’t your Duke email.
You are now ready interact with GitHub via RStudio!
If you don’t do this, we won’t be able to tell who you are and give you points for the work you do…
Note
Well, a more accurate statement would be that we will be reaching out to you to get things right during the first few weeks of classes. But, it’s best if you can get it right today!
Need a recap? Watch this video!
The following video walks you through the steps outlined in the SSH key generation and Git configuration sections above.
Clone your first repository
Now that you have your GitHub account set up, you can clone your first repository.
To do so, follow these steps.
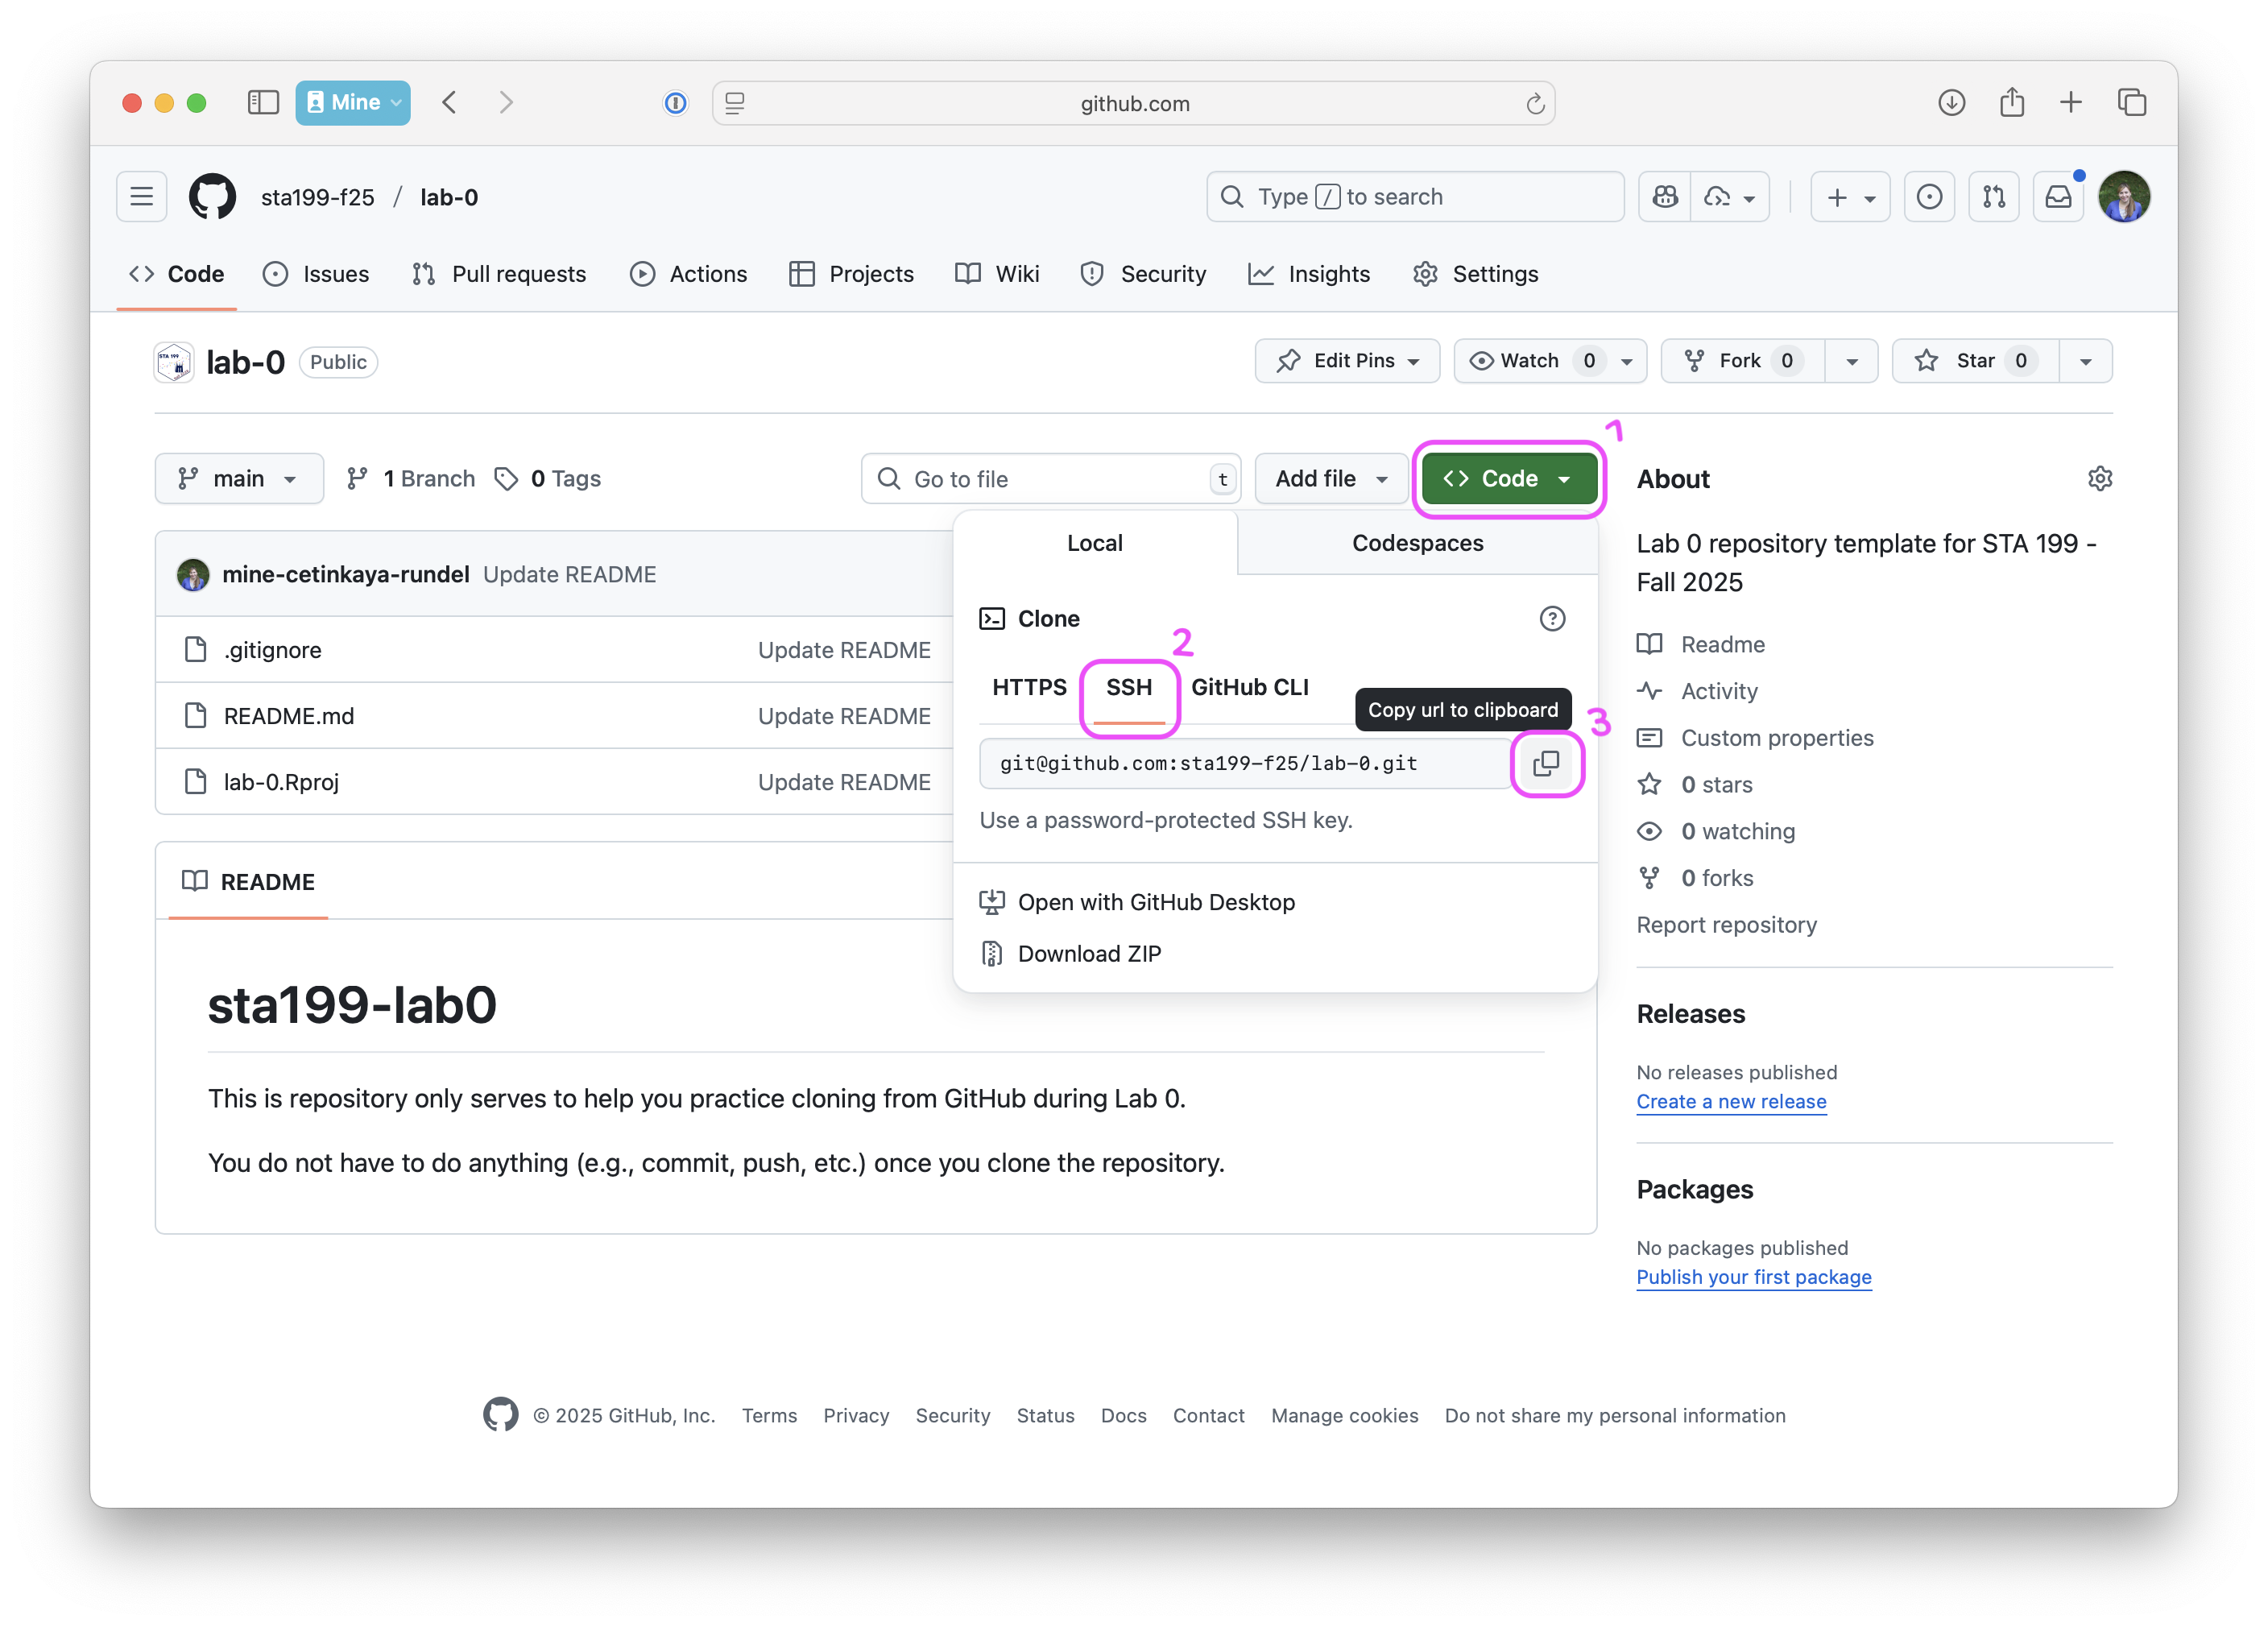
Go to the repository for lab-0 in the course GitHub organization: https://github.com/sta199-f25/lab-0.
-
Click on the green CODE button, select Use SSH (this might already be selected by default, and if it is, you’ll see the text Clone with SSH). Click on the clipboard icon to copy the repo URL.
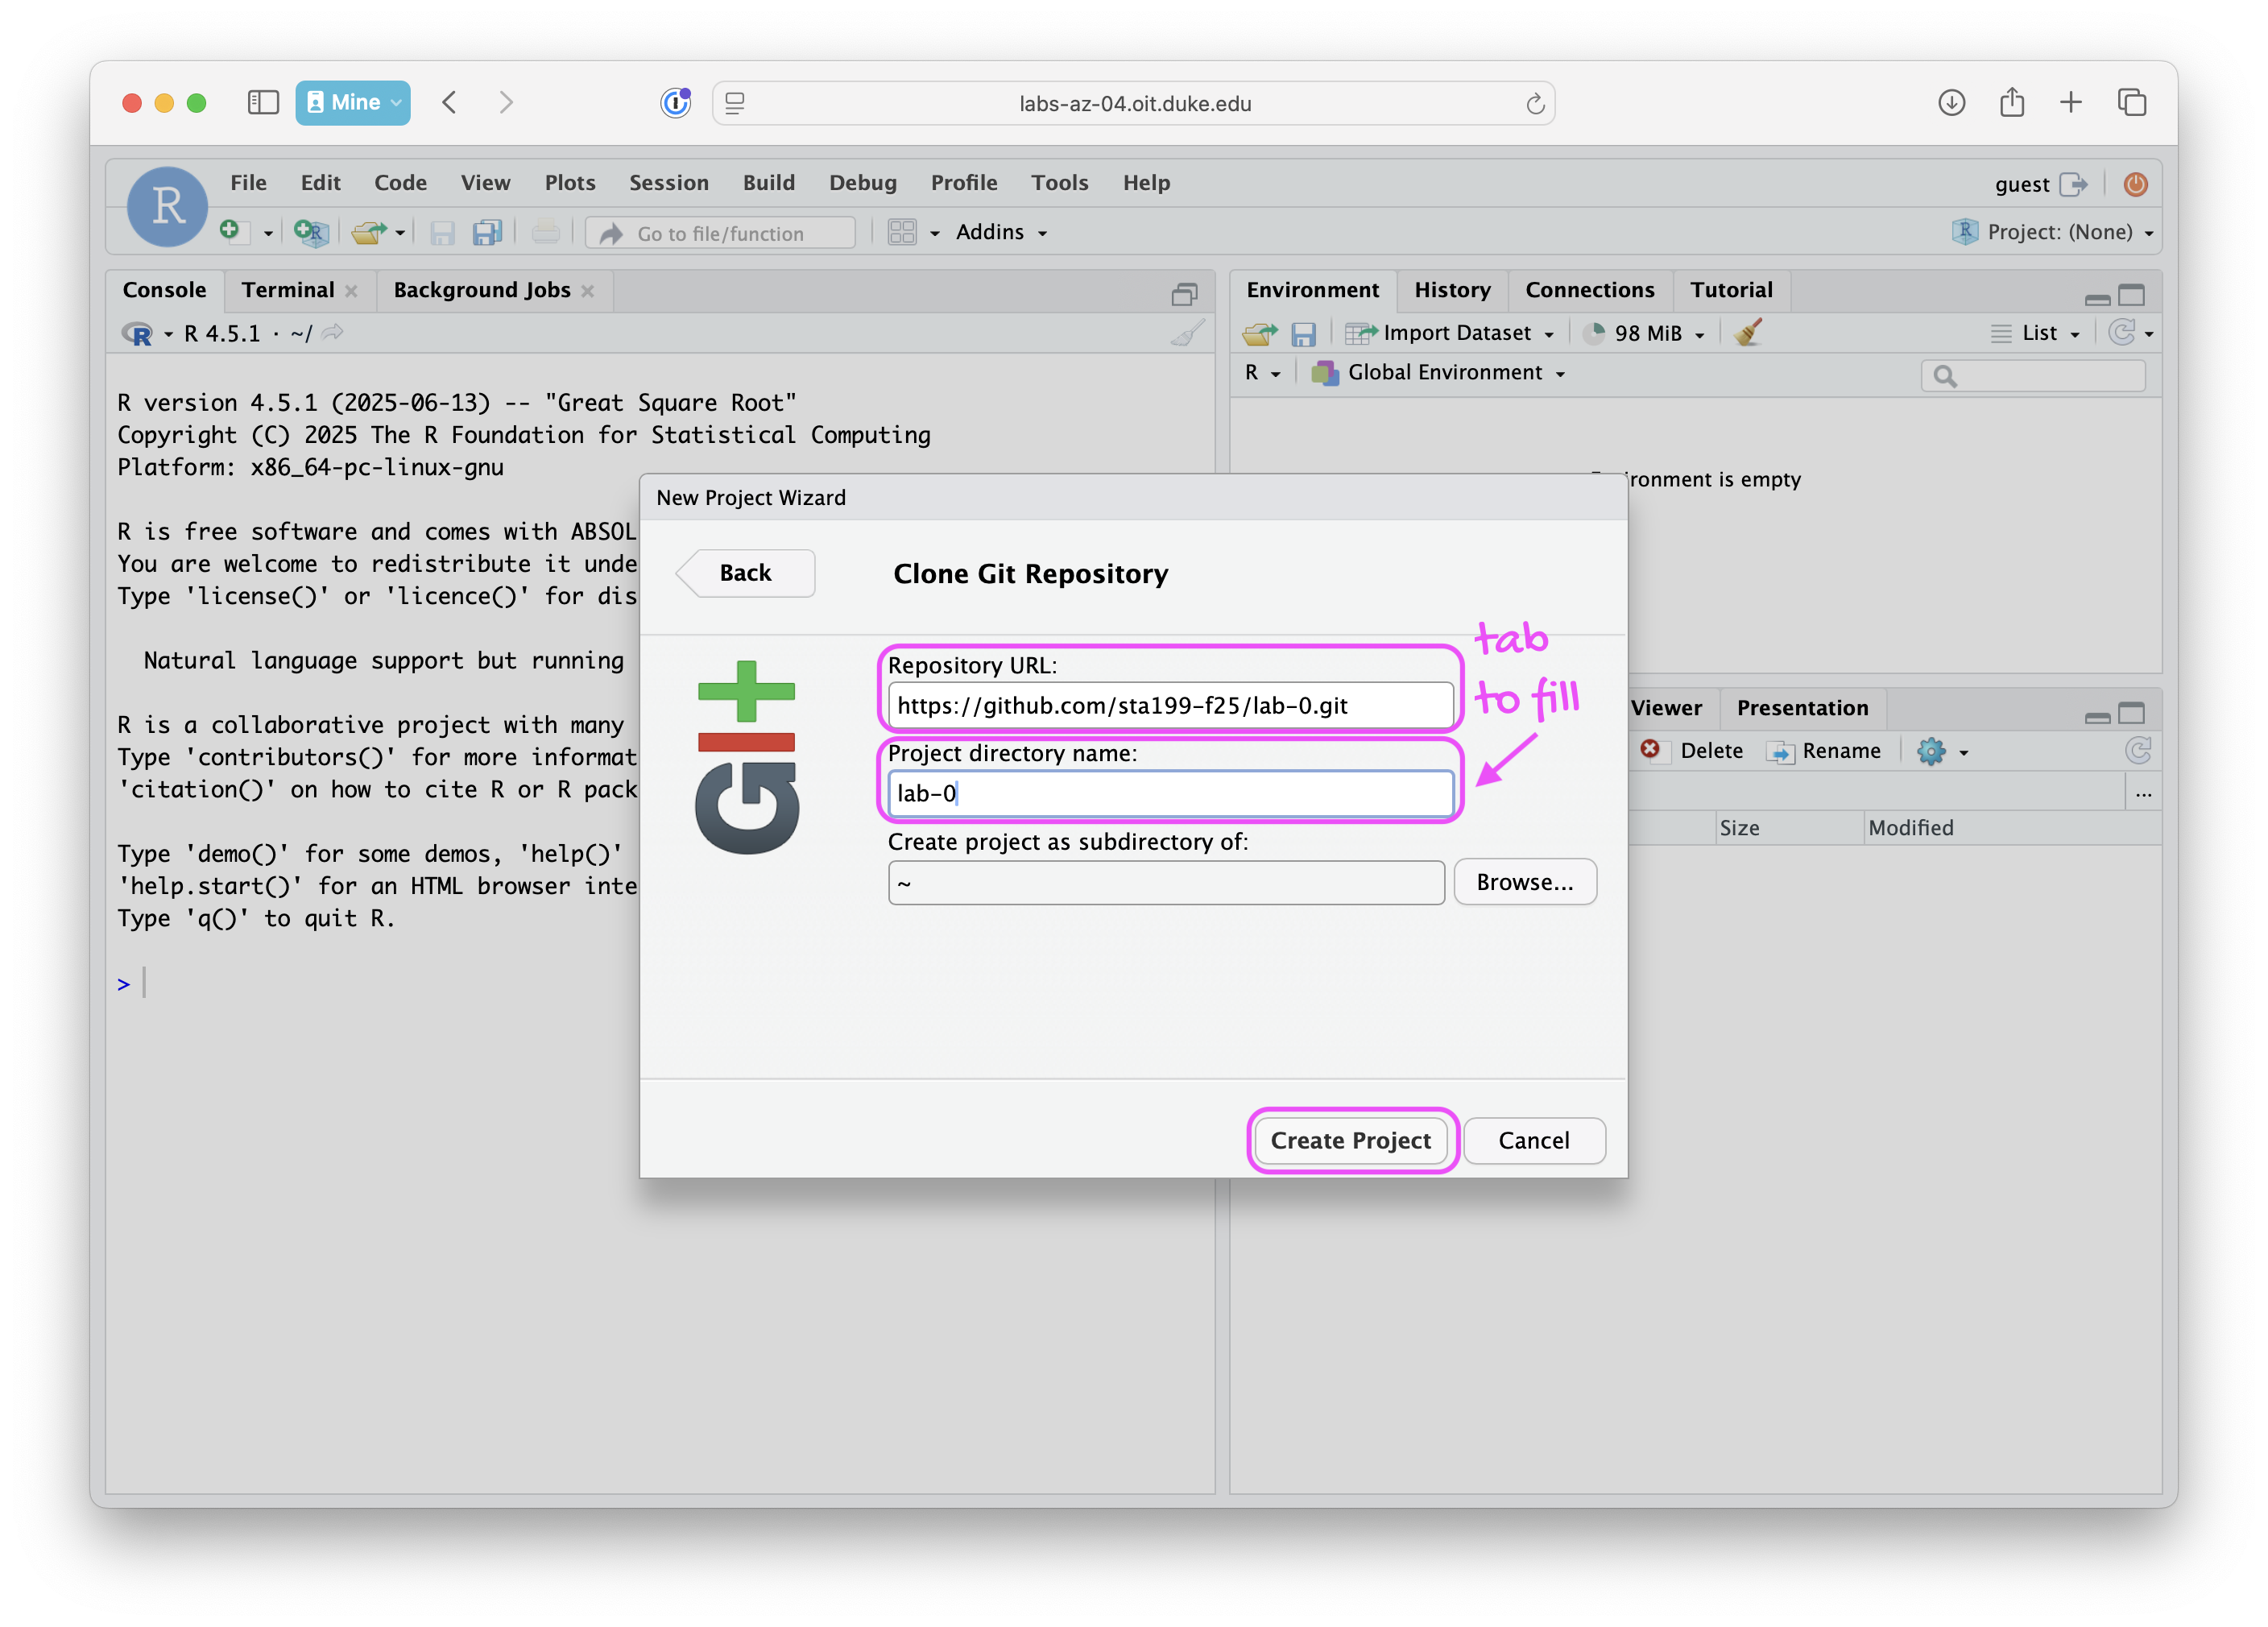
In RStudio, go to File ➛ New Project ➛Version Control ➛ Git.
Copy and paste the URL of your assignment repo into the dialog box Repository URL. Again, please make sure to have SSH highlighted under Clone when you copy the address.
-
Click Create Project.
-
Since this is the first time you are connecting to GitHub from this RStudio instance, you will be asked to confirm the authenticity of the host. This will happen in a pop-up window like the one below. Type yes in the box and hit Enter.
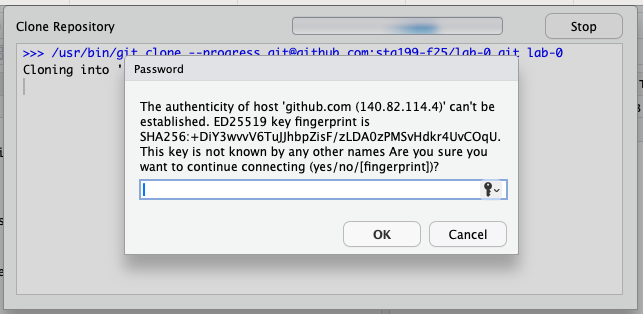
RStudio will now clone the repo and create a new RStudio project for you. This might take a few seconds. Once done, the files from your GitHub repo will be displayed in the Files pane in RStudio.
Hello STA 199!
Fill out the course “Getting to know you” survey on Canvas: https://canvas.duke.edu/courses/61539/quizzes/37441.
We will use the information collected in this survey for a variety of goals, from inviting you to the course GitHub organization (and you should accept that invite soon as you see it in your mailbox!) to getting to know you as a person and your course goals and concerns.
Footnotes
Yes, it’s too many steps. I don’t know why! But it works, and you’ll get used to it. Trust me, it beats downloading and installing everything you need on your computers!↩︎
GitHub has some perks for students you can take advantage of later in the course or in your future work, and it helps to have a .edu address to get verified as a student.↩︎